What's Hot? What's Trending? LauRen is a trendy Mommy Blogger that loves Fashion - Food - Family - Fun! It's all the F-words a Lady should know! From her personal struggles being a first time mom to products she can't live without, you can laugh, cry and SHOP with this little fashionista!
During quarantine, I have been trying all kinds of recipes. My husband Dallas just says I’m nesting since I’m pregnant but I wanted to share this easy gem with you. Homemade Chicken Pot Pie…and “it’s easy as pie to make!”
Ingredients and Grocery list:
2 pre-cooked chicken breasts, diced into small bite-size pieces. I typically just get a whole roasted chicken and use all the meat.
Frozen vegetables. They work better than canned, they’re already diced which saves a bunch of time!
Diced Onion
Melted butter
Store-bought pie crust from the freezer section.
Puff pastry sheets for the top of your pie, so that it is nice and flaky. You will have to cut it down.
Can of cream of chicken soup
Salt and pepper
Thyme, Parsley, Herbs, or just use poultry seasoning
Start with a medium to large saute pan. Add some butter to it and let it heat up.
Add your diced onion and allow to soften, then all of your herbs/seasonings, heat.
Sprinkle in frozen mixed veggies and allow them to soften, break up any stuck together.
Stir in chicken with all contents.
Pour cooled mixture in and cook for 10-15 mins
Take out of the oven and add top crust, just laying the crust to meet the edges.
Cut X slits on top to allow steam to escape.
Brush whisked egg on top layer if you’d like it to brown really nicely.
Bake at 420 degrees for 30 minutes or until the top is golden brown.
Let it cool when done for 15 minutes before slicing so it comes out nicely.
Directions:
The only real prep necessary is dicing your meat and simmering your onions. Beyond that, it is just throwing it all in to make your filling!
Happy Sunday! I hope you all are out and about enjoying this gorgeous weather! Cashton is down for his afternoon nap so I thought I would jump on here and share a recipe I am baking right now. If you follow my blog, you might know that we go through a TON of bananas in our house as they are Cash's favorite fruit. However, from time to time we don't use them all and I HATE to throw away food, so I found this recipe on Pinterest and modified it to fit our needs.
I love simple recipes that aren't full of empty calories with hydrogenated oils, fats, and garbage in them. This chocolate chip banana bread is sure to satisfy your sweet tooth with only four ingredients.
INGREDIENTS:
1.5 Pounds Of Bananas - That's about 4-5 medium bananas. The riper the better. This will naturally sweeten the loaf.
1 Cup Peanut Butter- I use organic but any peanut butter will do. You can also substitute with almond butter.
2 Cups Oatmeal- Oats give the bread texture. This is the perfect sub for flour and if you want to go gluten-free you can use gluten-free oats.
1 Cup Chocolate Chips- I use dark chocolate of course, but you can use your favorites.
That's it! The original recipe called for these ingredients to be blended in a blender but I was unsuccessful with this method. It's a little more work but I prefer hand mashing the bananas, oats and peanut butter together, then adding the chocolate chips last.
Place mixture in a lightly greased 9x5 loaf pan. Bonus points if you have parchment paper to line the pan as well. Bake for 30 mins in the oven at 350 degrees and you're good to go!
Make sure your bread is completely cool before removing it from the pan.
My absolute favorite part of Thanksgiving is cooking the turkey! There is something about getting up early with my son Cashton and prepping the bird while we watch the Macy's Thanksgiving Day Parade.
This year after my prep work was done I made everyone a light egg cup breakfast ( I will share this easy recipe in a future blog) and headed off to a holiday spin class with my sisters-in-law. It felt great to get our sweat on for 45mins at CycleBar, especially knowing the feast ahead.
My goal was to have my 18lb turkey in the oven by 11am which is why I rinsed the dry brine off the turkey, made the bird stuffing, and marinated the veggies for the pan before I left for spin. That way all I had to do when we got home was throw the veggies in the bottom of the pan, stuff the bird and get that big boy in the oven!
Here is my recipe for the perfect champagne turkey.
Shopping List:
Turkey
William Sonoma Dry Brine
Brine Bag
Champagne
Carrots
Celery
Garlic
Shallots
Rosemary
Chicken Stock
Butter
Seasoning
Stuffing (I use Stove Top Turkey Stuffing)
Twine
Tin Foil
Directions:
24 hours before cooking, take thawed turkey and rub with dry brine. Place in brine bag and refrigerate overnight.
This is an optional step but you can marinate your veggies in chicken stock the night before as well. Just mix carrots, shallots, garlic, and celery in a large zip lock bag and add stock.
The next morning rinsed brine off bird and dry. Place on rack in roasting pan and mix melted butter and seasoning together. Brush bird with mixture and slide a few slices of butter under the skin around the breast. Garnish with rosemary.
Add veggies to the bottom of the roasting pan. The veggies and drippings are AMAZING when done.
Make Stove Top stuffing. I recommend 3 boxes.
Stuff bird right before baking and tie legs together with twine.
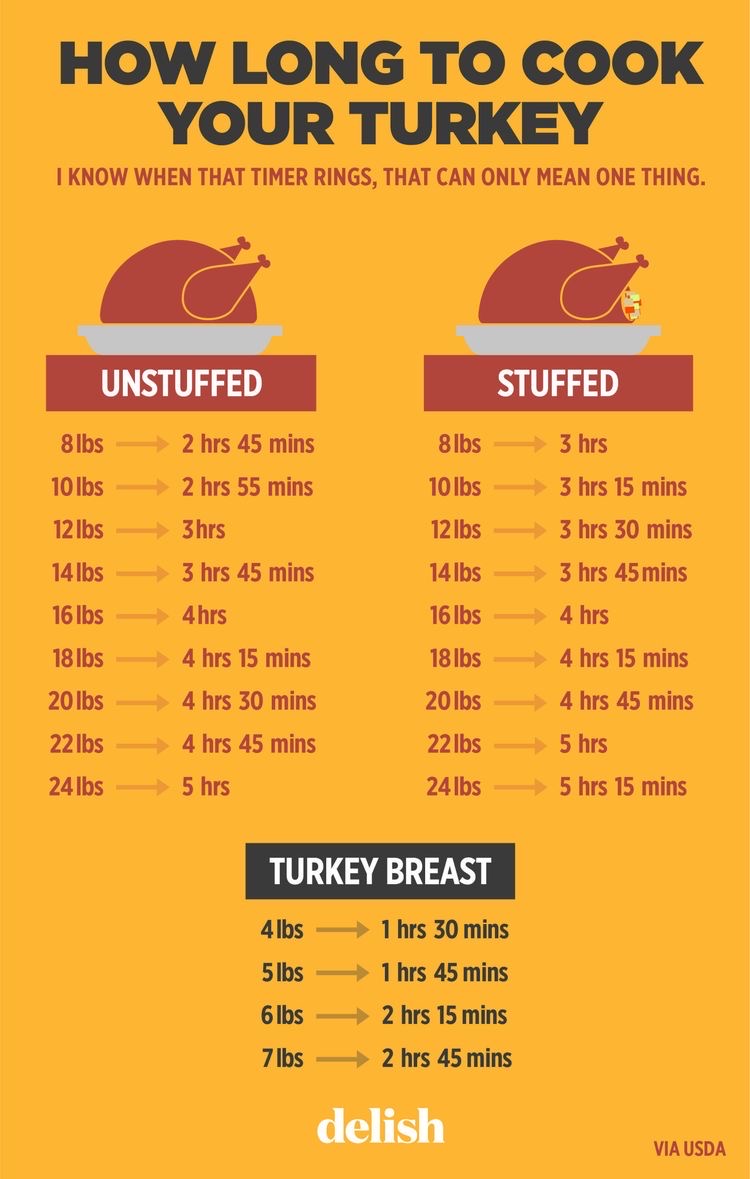
Bake at 350. The time is based on the weight of your turkey but I have included a time to weight chart below.
Let bake uncovered for 30 mins only basting with chicken stock until skin is browned, then cover with tin foil and start alternating between champagne and stock every 30 mins.
Caramel Apple Mimosa:
If you listen to our show you may know that my mother is a wonderful bartender and she always comes up with the most amazing cocktails for my events and holiday parties. This year she opted to make a Caramel Apple Mimosa for our brunch spread before Thanksgiving dinner. Here is what you need to make this sparkling beauty happen!
Ingredients:
1 1/2 oz of Stoli Vanilla Vodka
Apple Cider
Prosecco
Ice
Garnish with rosemary and whole cranberries
Caramel, cinnamon, and sugar for the rim
Table Design:
When it comes to table design, I have been working on this look for weeks. I really wanted to use our wedding china that we have only pulled out a handful of times in 10 years. I revolved our silver Vera Wang Grosgrain settings and chargers around the soft gold hues that our dining room is decorated in. I enhanced these colors by renting gold Chiavari chairs from Party Reflections and adding white and gold pumpkins along with crystal candlestick holders for our centerpieces. To keep these colors from falling flat I wove eucalyptus garland through the table runner for a pop of green.
Our Aupair Elena was sweet enough to help me with place cardholders. I have terrible handwriting and I am well aware of it. Elena also helped me with the labels from Cashton's birthday party so I knew she was the right person for the job! I found some adorable Thanksgiving place cards at Sur la table. They were 2 dimensional and featured a turkey with real feathers for some holiday flare.
When we sat down for dinner this year I started to reflect on our Thanksgiving holidays of the past and decided that this Thanksgiving was my favorite of all. It's not often you can get BOTH sides of your family together, especially when they are scattered along the east coast. This year's turkey feast left me feeling extra loved and blessed like no other.
This Thanksgiving our family is doing something we haven't done in years. We are entertaining both sides of our relatives for the weekend and we'll be hosting thirteen for dinner Thanksgiving day.
We will be preparing two twenty-pound turkeys, one in our deep fryer and the other in the oven with my Champagne recipe. Our family has divided the rest of the menu so that not one single person has to carry the load. The other dish that I have volunteered to make is pumpkin pies.
I found a simple recipe on Pinterest but things didn't quite go the way I had planned on my first go-round. However, after making some adjustments I think I have perfected these blueprints for the perfect pumpkin pie!
Ingredients
115 ounce can pumpkin puree
114 ounce can sweetened condensed milk
2large eggs & 1 egg for egg wash
1teaspoonground cinnamon
1/2teaspoonground ginger
1/2teaspoonground nutmeg
1/2 teaspoon pumpkin spice
1/2teaspoonsalt
1/4 teaspoon ground cloves
1unbaked deep-dish pie crust
1 sheet of roll out dough
Instructions
Preheat oven to 425-degrees. Prepare a pie crust in a pie plate. I put my store-bought pie crust on a cookie sheet to give the pie more stability when taking it in and out of the oven. Egg wash the sides of the pie crust so that it does not burn.
Combine all wet ingredients in a bowl and the dry ingredients in a separate bowl. Then in a medium-sized mixing bowl, whisk together the wet and dry ingredients until smooth. Pour into pie crust.
Bake in a 425-degree oven for 15 minutes. Reduce temperature to 350 degrees and continue baking for 35-40 minutes. You'll know it is done when you can tap the middle and it doesn't jiggle. If the pie is baking faster then you like on top, feel free to cover with foil.
While the pie is baking roll out the store-bought dough and use cookie cutters to produce the designed you would like on top of your pie. I opted for fall leaves. Spray your cookie sheet with Pam and egg wash your cutouts. Bake alongside your pie until golden brown.